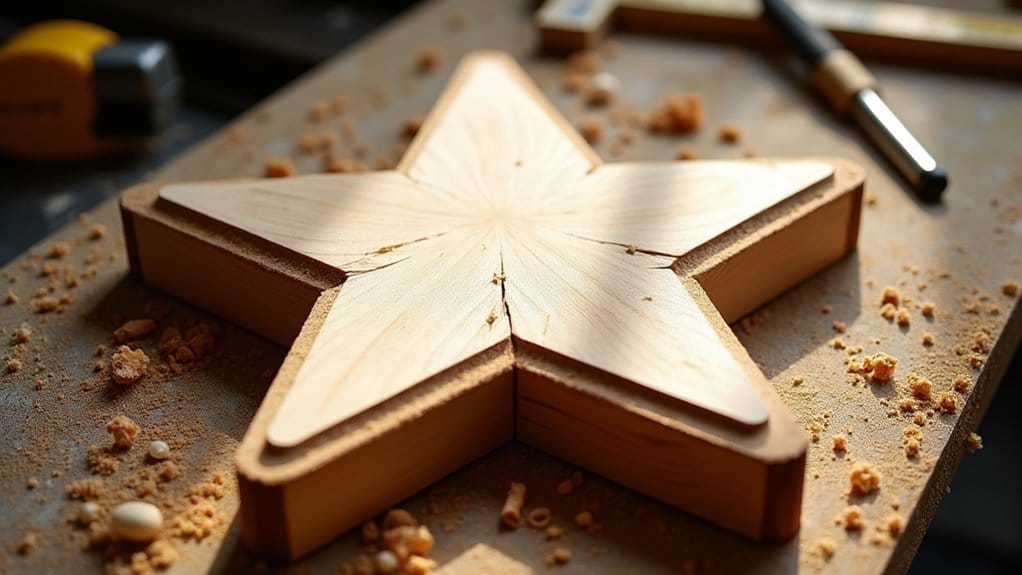
You’ll find that creating a 3D wooden star isn’t just about cutting and assembling pieces – it’s about precision and technique. This project requires specific measurements, proper wood selection, and careful attention to angles. While you can complete this decoration in about 2-3 hours, the key lies in your initial setup and material choices. Let’s explore how to transform basic 1×6 inch lumber into a professional-looking star that’ll enhance any space in your home.
Key Takeaways
- Gather essential materials including 1×6 inch pine/cedar planks, wood screws, hanging twine, and precise cutting tools like a jigsaw.
- Create a star template with 4-inch inner points and 8-inch outer points, maintaining 36 and 72-degree angles for accuracy.
- Cut five identical star pieces from the wood, following template lines carefully with a jigsaw or scroll saw.
- Sand wooden pieces progressively using 80-grit to 180-grit sandpaper, always following the wood grain direction.
- Assemble star points at 72-degree angles using wood glue, then add protective finish and hanging twine for display.
Materials Needed to Make a 3D Wooden Star

To construct a 3D wooden star, you’ll need 1/4-inch thick pine or birch boards measuring at least 12×12 inches, plus #6 wood screws or 1-inch straight pins for secure assembly points.
Your essential cutting implements should include a scroll saw or coping saw for precise star point cuts, along with a sharp utility knife for template work and detail refinement.
The final materials include 12 inches of sturdy twine rated for at least 5 pounds of weight, and a paper template sized to your desired star dimensions, typically 8-12 inches in diameter.
Wooden boards (type and thickness)
The most suitable wooden boards for a 3D star are 1×6 inch pine or cedar planks with a thickness of ¾ inch.
For smaller stars, you can opt for ½-inch thick material, though it’s less stable.
Avoid boards thicker than 1 inch, as they’ll make your star too heavy.
When selecting your wooden boards, check for straight grain patterns and minimal knots to guarantee clean cuts and professional-looking joints.
Twine for hanging
Selecting proper hanging material proves just as important as your wooden board choice. You’ll need sturdy twine rated for at least 10 pounds to safely hang your wooden star. Choose natural jute or synthetic nylon twine with a 2-3mm thickness.
Pins or screws for assembly
Strong joints demand proper fasteners when assembling your 3D wooden star. You’ll need 1-inch wood screws or 18-gauge finishing nails to join each point securely.
If using nails, slightly countersink them using a nail set. For a cleaner look, choose screws with heads that can sit flush with the wood surface.
Template for cutting the star shape
Creating accurate star templates starts with heavy cardstock or 1/8-inch plywood for durability.
To draw perfect stars, start with a circle and divide it into five equal sections at 72-degree angles. Connect the points to form your star pattern.
Cutting tools (saw, utility knife)
The right cutting tools make precise star construction achievable. You’ll need a combination of power and hand tools to cut your wooden star components accurately.
Sandpaper for smoothing edges
Proper surface preparation demands multiple sandpaper grits ranging from 80 to 220 for achieving professional-grade wooden star edges.
Paint or finish (optional)
While finishing your wooden star remains optional, selecting the right protective coating will enhance its appearance and longevity.
For a natural look, apply clear polyurethane or wood sealer to protect against moisture and wear. If you’re adding color, choose either water-based or oil-based paint specifically formulated for wood surfaces.
How to Create a 3D Wooden Star: A Step-by-Step Guide
This extensive guide walks you through the five essential steps to construct a professional-grade 3D wooden star.
You’ll begin by creating a precise template and cutting your wooden pieces at 45-degree angles before proceeding to sand each edge to achieve a seamless fit.
The final steps involve assembling the star’s components using wood glue and clamps, with an optional twine attachment for hanging your finished creation.
Step 1: Prepare the Template
Creating an accurate template marks the essential first step in constructing your 3D wooden star. You’ll need to measure and draw a perfect five-pointed star on sturdy paper or cardboard.
| Measurement | Inner Points | Outer Points |
|---|---|---|
| Length | 4 inches | 8 inches |
| Width | 2 inches | 4 inches |
| Angle | 36 degrees | 72 degrees |
| Depth | 1.5 inches | 3 inches |
Transfer your template onto 1/4-inch plywood using a pencil. You’ll need five identical pieces for your 3D wooden star. Double-check all measurements before cutting, as precision guarantees proper assembly later. Mark the center point and use a protractor to maintain consistent angles between points.
Step 2: Cut the Wooden Pieces
Armed with your template and plywood pieces, begin the cutting process using a jigsaw or scroll saw equipped with a fine-toothed blade.
Position your plywood on a stable work table and secure it firmly. You’ll need to cut five identical star pieces with precise 72-degree angles at each point’s intersection.
- Measure each star arm to exactly 8 inches in length from center to tip
- Cut slowly along the template lines, maintaining steady pressure for clean edges
- Sand each piece’s edges with 120-grit sandpaper after cutting
Remember to wear safety goggles and keep your fingers at least 3 inches away from the blade while cutting the pieces.
Step 3: Sand the Edges
Now that your star pieces are cut, proper sanding is essential for both safety and aesthetics. Start with 80-grit sandpaper to make each point smooth, then progress to 120-grit for refinement. Sand along the grain to prevent scratches.
| Grit Type | Purpose |
|---|---|
| 80-grit | Remove rough edges |
| 120-grit | Smooth surface |
| 180-grit | Fine detailing |
| 220-grit | Final polish |
Focus on each line intersection where pieces will join. Hold sandpaper at a 45-degree angle when working on points. Check your progress by running your finger along edges – they should feel completely smooth with no splinters or rough spots.
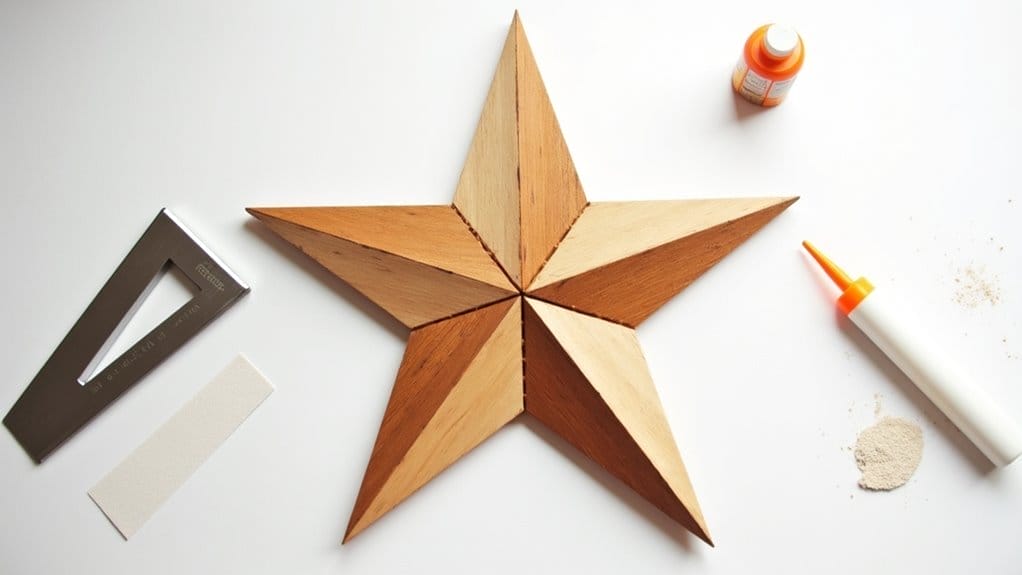
Step 4: Assemble the Star
After laying out your sanded pieces on a flat work surface, you’ll begin the assembly process by joining the first two star points at a precise 72-degree angle.
Apply wood glue along the joining edges and hold the two pieces firmly for 30 seconds to guarantee proper adhesion.
- Connect the remaining pieces one at a time, maintaining the 72-degree angle between each point to create the 3D effect.
- Use clamps to hold each joint while the glue sets for 20 minutes.
- Check that all five points fit together symmetrically, with the central pentagon forming naturally as you assemble the final pieces.
Step 5: Add Twine for Hanging (Optional)
Once your wooden star has fully dried, you’ll need to select a strong twine or cord rated for at least 5 pounds of weight.
Cut a 12-inch length of twine for ideal hanging flexibility. Drill a 1/8-inch pilot hole at the uppermost point of your DIY star decoration, approximately 1/2 inch from the edge.
Thread the twine through the hole, creating a loop with 5-inch sides. Secure with a double knot, leaving 1 inch of excess.
Place a small dot of wood glue on the knot to prevent unraveling. Let the glue dry for 2 hours before use.
Step 6: Finish Your Wooden Star
The final step in making a wooden star involves applying a protective finish. For this Christmas decoration tutorial, you’ll need to seal your wooden star properly to guarantee longevity.
- Apply a thin coat of polyurethane finish using a foam brush, ensuring even coverage across all surfaces and edges.
- Let the first coat dry for 2-3 hours at room temperature (70°F), then lightly sand with 220-grit sandpaper.
- Add a second coat, making sure to reach all corners and joints, and allow 24 hours for complete curing.
Once finished, your wooden star will have a professional sheen and lasting protection against moisture and wear.
Frequently Asked Questions
Can I Use Reclaimed Wood to Make the 3D Star?
Yes, you can use reclaimed wood, but you’ll need to guarantee it’s flat, dry, and has minimal warping. Select pieces that are 1/4 to 1/2 inch thick and sand them to uniform thickness before assembly.
How Long Does the Finished Wooden Star Typically Last?
Your wooden star will last 10-15 years indoors when you’ve properly sealed it with polyurethane. If you’ll display it outdoors, you’ll need to reapply sealant annually and expect 5-7 years of durability.
What’s the Best Way to Hang a Heavy 3D Wooden Star?
You’ll need a 50lb-rated keyhole hanger mounted at the star’s center of gravity. Install two 2-inch wood screws with wall anchors, spacing them 4 inches apart for ideal weight distribution and stability.
Can I Paint the Star After Applying Wood Stain?
You’ll need to wait 24-48 hours after staining before applying paint. Sand the surface lightly with 220-grit sandpaper, then apply an oil-based primer. Once that’s dry, you can paint your desired color.
How Do I Protect My Wooden Star for Outdoor Display?
You’ll need to apply 2-3 coats of exterior-grade polyurethane sealant, letting each coat dry for 24 hours. Use UV-resistant clear coat as the final layer to prevent sun damage and moisture penetration.
Conclusion
Following these precise measurements and assembly steps, you’ll create a professional-quality 3D wooden star measuring 24 inches from point to point. The 45-degree angle cuts and 3/4-inch wood screws guarantee structural integrity, while the 220-grit sandpaper provides ideal smoothness. Apply two coats of polyurethane sealant, allowing 24 hours between applications. Your completed star, with its 12-inch twine hanger, will maintain stability for years.