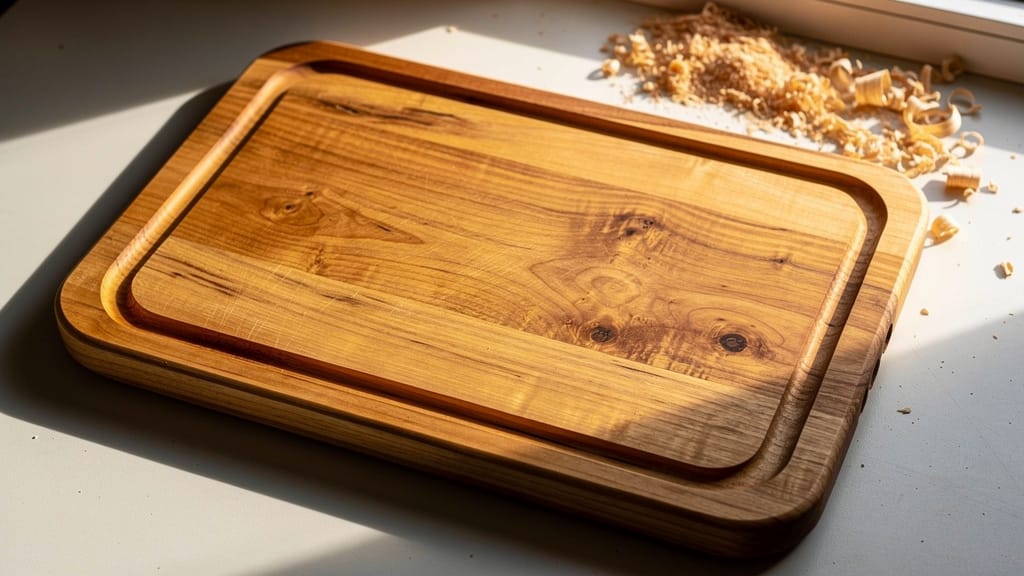
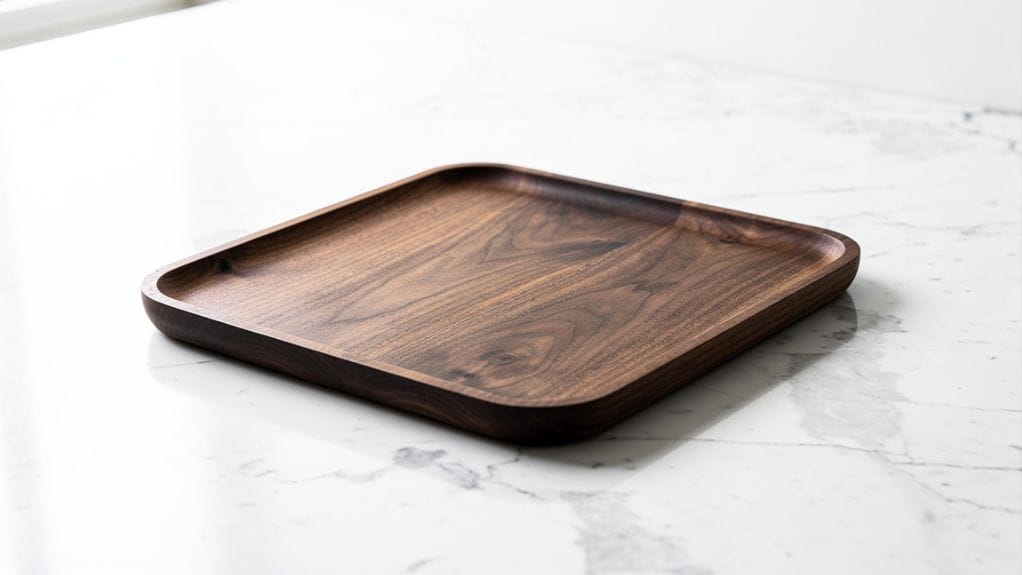
Crafting a wooden tray combines our artistic vision with technical precision. Whether we’re making a simple breakfast tray or an ornate serving piece, the process begins with selecting the right materials and applying basic woodworking techniques.
From selecting hardwoods to mastering essential joinery techniques, each step builds upon the last. Below, we outline how to make a wooden tray and how we transform raw lumber into a functional, handcrafted tray.
Key Takeaways
- Select quality hardwood like maple or walnut. This ensures boards are properly dried and free from defects.
- Cut wood pieces to size: the bottom panel from maple strips and the sides from walnut, with handle cutouts.
- Create grooves in walnut side pieces to securely hold the tray bottom, then assemble using wood glue.
- Sand all surfaces progressively with finer grits until smooth, paying special attention to edges and joints.
- Apply mineral oil for protection, followed by paste wax for a durable finish and attractive sheen.
Material Selection: Choosing the Right Wood

When selecting wood for our serving trays, we choose maple and walnut as popular options. They offer both durability and aesthetic appeal.
We consider our clients’ preferences and the intended use of the tray to guide the choice between premium hardwoods for formal dining or more affordable species for casual use.
Common Types of Wood
Since our wooden trays often serve as centerpieces, selecting the right wood is crucial for both durability and aesthetics. Creative uses for wooden trays can elevate your home décor, whether you’re displaying fresh fruit or organizing kitchen essentials. Additionally, they can be turned into charming serving platters for gatherings, adding a rustic charm to your entertaining. Thinking outside the box can inspire a variety of functional and decorative applications that showcase the beauty of wood.
Popular hardwoods like walnut and maple stand out as excellent choices for their distinct characteristics. Maple offers a light, fine-grained appearance with superior scratch resistance. Walnut delivers a rich, dark tone that exudes elegance.
Both woods feature straight grain patterns that enhance the tray’s visual appeal, particularly around handle areas.
For lasting protection, we treat these hardwoods with mineral oil and paste wax to guard against moisture damage.
Selecting Materials Based on Client Requirements
Understanding our clients’ specific needs guides us to the perfect wood selection for their custom trays. When selecting hardwoods, we consider both functionality and aesthetics to create pieces that meet our clients’ expectations.
We always select kiln-dried lumber to prevent future warping and cracking. We pay close attention to grain direction, since it affects both strength and appearance.
| Requirement | Wood Choice |
|---|---|
| Durability | Maple |
| Visual Appeal | Walnut |
| Stability | Kiln-dried |
The Importance of Sustainability and Responsible Sourcing
Today, our environmentally conscious approach means sustainable sourcing is not just a trend—it’s a responsibility.
We choose sustainably sourced wood certified by FSC or SFI to support responsible forestry practices. We prefer to use locally sourced walnut and maple whenever possible. Because they reduce the project’s carbon footprint and help support the local economy.
We also consider using reclaimed wood to add unique character while minimizing waste.
After selecting materials, we opt for eco-friendly finishes like mineral oil or paste wax. These natural options protect both the tray and the environment by avoiding harmful chemicals.
Design and Customization: Fulfilling Client Requirements

We offer a range of standard tray sizes, from small serving trays to large ottoman trays. Or, we can produce custom dimensions tailored to a client’s specific needs.
We add personal touches through branding options such as laser-engraved logos, wood-burned designs, or custom stains that complement the client’s aesthetic.
Before finalizing a design, we provide a small-scale prototype or material samples. So, the tray’s proportions, wood selection, and finish meet the client’s expectations.
Differences Between Standard and Custom Sizes
Whether we craft a wooden tray for everyday use or a DIY project, size selection plays a crucial role in functionality.
Our standard sizes typically range from 12 to 18 inches in length and 8 to 12 inches in width. This makes them versatile for common serving needs.
When a personalized approach is required, our custom sizes offer flexibility to match unique table dimensions or special requirements. Clients can specify exact measurements, handle placement, and depth.
Services for Branding: Logo Engraving, Stamping, and Coloring
Beyond sizing considerations, our branding options can transform a basic large serving tray into a distinctive marketing tool.
We offer three primary customization methods to enhance these DIY wood trays: logo engraving, stamping, and coloring.
Logo engraving delivers precise, permanent designs that ensure lasting brand recognition.
If clients want texture, stamping creates unique patterns that add a professional, tactile element.
For color consistency with a brand, we apply stains or paints that protect the wood while matching the required palette.
We can combine these services to create a truly unique product that meets specific requirements.
Rapid Prototyping and Sample Procedures
Before committing to full production, we utilize rapid prototyping to test and refine our wooden tray designs efficiently. We create small-scale models using less expensive materials to validate woodworking concepts and gather client feedback.
Incorporating client suggestions during the prototyping phase leads to better outcomes. We use this stage to test handle placements, groove depths, and overall proportions. By leveraging rapid prototyping techniques, we save time and materials while ensuring the final wooden tray meets exact specifications.
| Prototyping Step | Client Benefit |
|---|---|
| 3D Modeling | Precise dimension customization |
| Scale Models | Visual representation of design |
| Feature Testing | Validation of functionality |
| Client Review | Implementation of suggestions |
How to Make a Wooden Tray: Step-by-Step Production

We select and mill maple and walnut to the required dimensions. We then glue and assemble the maple base, cut precise grooves in the walnut sides, and join the parts with proper joinery for a square, strong assembly.
After thorough sanding, we finish the tray with mineral oil and paste wax to enhance the wood and protect against moisture.
Raw Material Preparation
When making a serving tray, proper material preparation sets the foundation for success. We select high‑quality maple boards for the bottom of the tray and walnut for the sides. Before cutting, we verify the stock is properly dried and free from defects to ensure a food‑safe serving piece.
We mill the maple into uniform strips using a table saw or jointer, and cut precise grooves in the walnut sides to securely hold the tray bottom. This raw material preparation guarantees the final product will be both beautiful and functional.
Cutting, Sanding, and Assembling Techniques
Our manufacturing process begins with the precise cutting of prepared materials.
- Using a miter saw and a stop block, we cut walnut side rails to 2.5 inches and end rails (for handles) to 3.5 inches.
- We create grooves in the walnut pieces to support the tray bottom and mill maple boards into strips that fit snugly into those grooves.
- During assembly, we check that all joints align correctly before glue‑up.
- After the glue cures, we trim any protruding splines and sand all surfaces progressively until smooth.
- Finally, we apply mineral oil and paste wax to protect the tray and enhance the natural beauty of the wood.
Surface Finishing
Once our tray’s construction is complete, proper surface finishing transforms it from a rough to a refined product.
- Trim any protruding splines and sand all surfaces, progressing through finer grits until a silky-smooth texture is achieved.
- Apply mineral oil generously, allowing it to penetrate and enhance the natural grain. This serves as the initial moisture sealer.
- After the oil has dried, add a protective layer of paste wax for a subtle sheen.
- Finish all areas thoroughly, including sides and handle cutouts.
- Reapply oil and wax periodically to maintain the tray’s appearance and protection.
Quality Control and Inspection Standards
Maintaining strict quality control throughout our wood tray production guarantees a professional, lasting result.
- We check wood moisture content, targeting 6–8% to prevent warping.
- We measure dimensions carefully during cutting, keeping tolerances within 1/16″ for rails and joints.
- After the glue‑up, we inspect for alignment issues and remove any excess glue.
- During final sanding, we use 220-grit (or finer, as needed) and verify that all edges and handle cutouts are smooth.
- For finishing, we ensure that mineral oil penetrates evenly (about 30 minutes) before buffing, and then confirm the finish is uniform before applying paste wax.
If any check fails, we adjust or rework the piece until it meets our standards before shipping.
Packaging and Bulk Delivery: Securing Product Integrity
Proper packaging is essential to deliver our wood trays safely to customers. We use protective materials like bubble wrap and foam to shield trays from scratches and dents.
We pack trays into custom-sized boxes with dividers to prevent movement during transit, seal packages with strong tape, and mark them as “Fragile.” For bulk orders, we arrange trays in protective layers and use sturdy outer cartons or pallets to withstand handling.
We also use moisture-resistant materials to guard against humidity and include a clear care guide with each shipment.
These packaging and delivery practices ensure our craftsmanship arrives at its destination intact and ready to impress.
Final Words
Making a wooden tray for our clients is more than just following the steps. It’s creating something special. We take pride in selecting premium hardwoods, crafting precise joints, and achieving a flawless finish.
Whether we produce a single custom tray or hundreds, our attention to material selection, design, manufacturing, and packaging ensures a quality product that stands the test of time.
We offer a wide selection of wooden trays, available for bulk orders and custom personalization. Contact us for details. Our custom wooden trays for restaurants are designed to enhance the dining experience while providing functional elegance. Each tray can be tailored to reflect your brand’s identity, making them perfect for any establishment. Let us help you elevate your service with high-quality, beautifully crafted trays that impress your customers.
FAQs
How to Waterproof a Wood Tray?
We begin by applying mineral oil to seal and nourish the wood. After the oil has fully dried, we apply multiple thin coats of a food-safe polyurethane or varnish. We’ll lightly sand between coats to ensure proper adhesion and a smooth finish. Finally, we recommend regular maintenance to ensure lasting water resistance.
What Is the Best Material for a Serving Tray?
For our serving trays, hardwoods such as walnut and maple are the best choices. They offer superior durability, attractive grain, and resistance to dents and warping. Walnut provides rich, dark tones for a luxurious look. Maple offers a light, clean aesthetic that suits many styles.