Misplaced keys seem like a small annoyance, yet they create daily friction and constant complaints about entryway products. The good news is that a wooden key holder behaves predictably once the process stays under control. With clear decisions on wood species, thickness, hook layout, and finishing, we can turn a tiny item into a reliable performer. In the sections that follow, we walk through materials, tools, our eight-step production method, layout logic, and quality control.
Key Takeaways
- Wood choice shapes strength, long-term stability, and visual style. It controls stain behavior and engraving clarity, and it sets the basic cost tier for each key holder family.
- Our factory process follows eight repeatable steps from measuring to final hook installation. Each step has a simple check so defects stop early.
- Hook layout and spacing decide how easy the key holders feel in daily use. Good spacing keeps keys from tangling and keeps the wall view tidy.
- Quality control checkpoints sit after cutting, sanding, staining, topcoat, and hardware work. Each checkpoint checks both function and appearance.
- QlycheeCrafts adds CNC cutting, laser engraving, and low VOC finishes to this framework. Our design and engineering teams support custom shapes and branding.
What Makes Wood the Right Material for Key Holder Production?
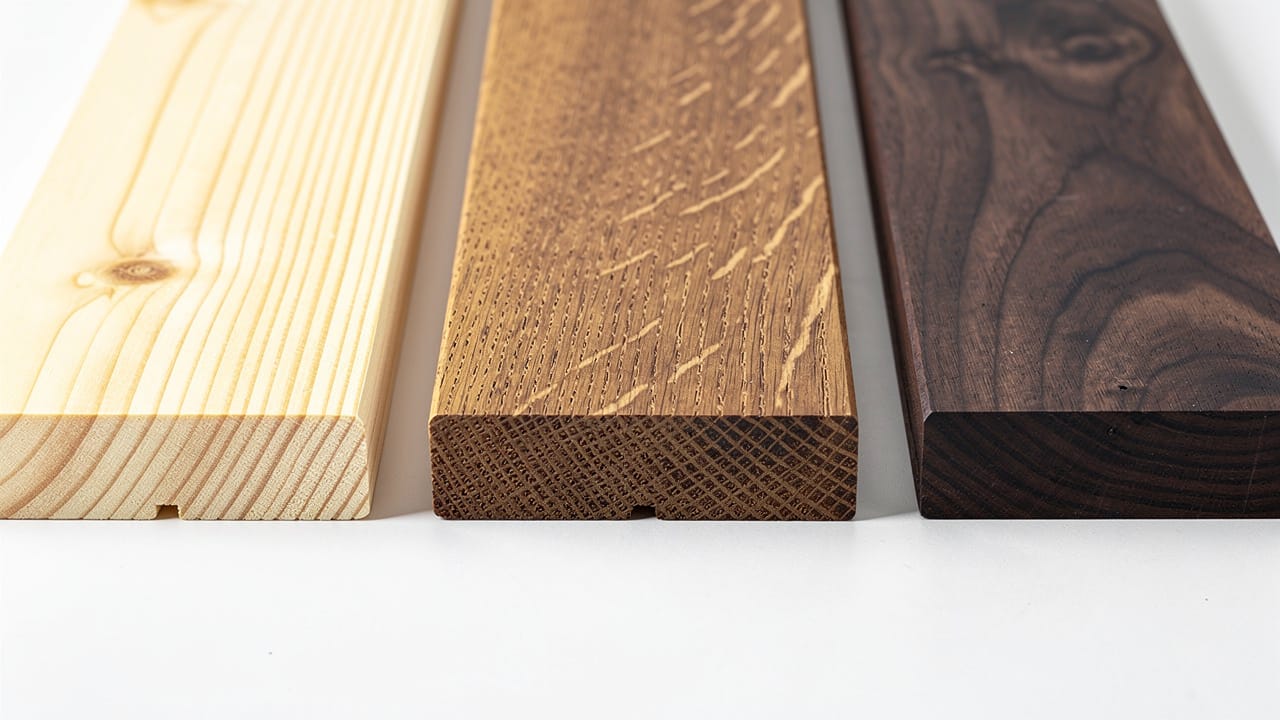
Wood fits key holder production because it balances cost, strength, and warmth in a way plastic and pure metal rarely match. A wooden board supports small hooks, accepts screws cleanly, and brings a home-friendly look straight out of the box.
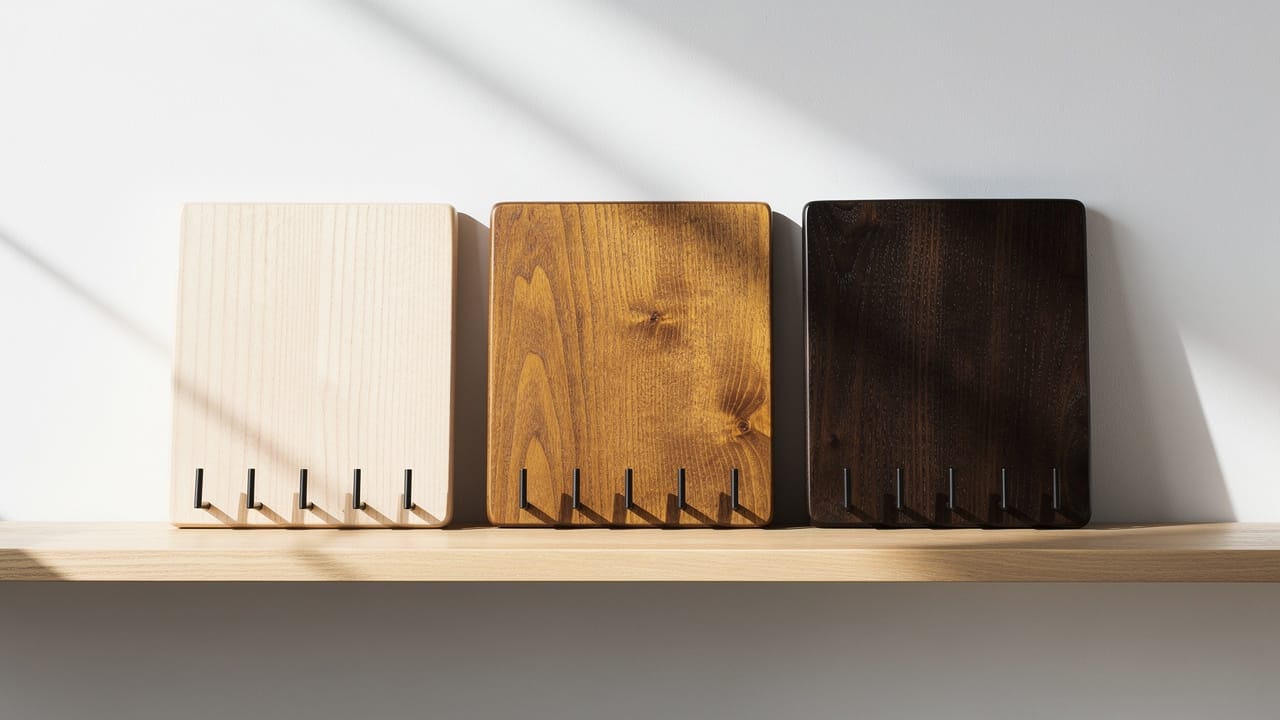
Grain pattern also matters more than many specs suggest. Straight-grain pine works well for minimal, Scandinavian-inspired pieces. Walnut with bold grain looks richer even with a clear finish, which reduces finishing time.
Two less visible specs matter just as much:
- Thickness: We keep our boards at about three-quarter-inch thickness. That size holds hook screws without splitting and keeps weight low for shipping.
- Moisture content: Our kiln drying keeps moisture at roughly 6–8 percent so panels stay flat during long ocean or warehouse periods.
Those two numbers influence long-term wall stability more than any single decorative choice.
Essential Tools and Materials for Factory-Level Production
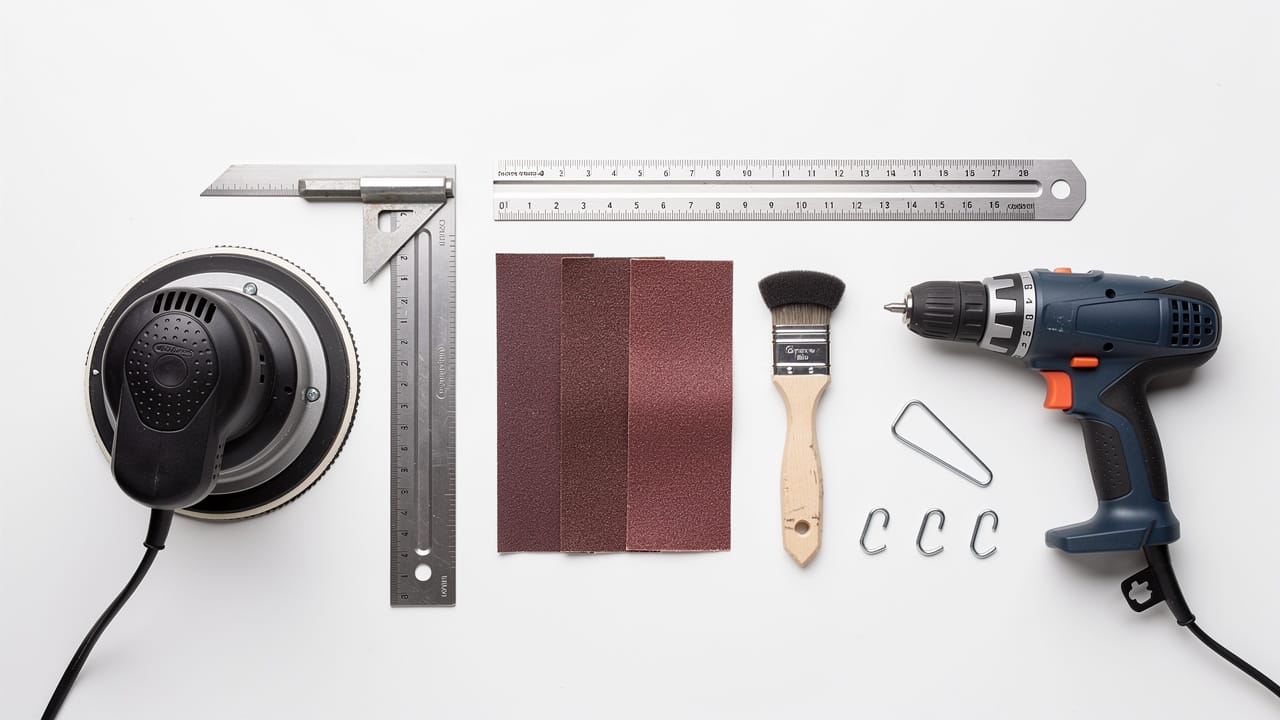
Factory-level production of wooden key holders runs well when tools stay simple and the bill of materials stays clear. We standardize our tool set so every line worker, engineer, and inspector follows the same steps.
We group tools into four main categories in our QlycheeCrafts workshop:
- Cutting tools: band saws, table saws, and miter saws for straight production cuts, plus CNC routers when a design needs house shapes or geometric panels.
- Measuring tools: combination squares, steel rulers, tape measures, and fine markers so hook layout and wall-hanger positions stay precise.
- Sanding and finishing tools: orbital sanders, sanding blocks with 120- and 220-grit sheets, foam brushes, and spray equipment for stain and topcoat.
- Fastening tools: drills, screwdrivers, hammers, and pliers so screws, hooks, and sawtooth hangers seat correctly.
How We Design and Produce Wooden Key Holders: Our 8-Step Factory Process
The QlycheeCrafts factory follows an eight-step process to design and produce wooden key holders with predictable quality at scale. Each step turns a design decision into a repeatable action, backed by jigs, CNC programs, and clear inspection points. When you know this process, you can evaluate any quote for how to design a key holder using wood and quickly see where risk may hide.
Step 1: Measuring and Marking the Wood
We treat measuring and marking as the first quality gate in our factory. For simple three-hook key holders, we often use boards close to 3⅜ by 8¾ inches, then adjust for your brand sizing and packaging. Our team uses combination squares and stops on cutting tables so reference edges stay square and repeatable across the batch.
On smaller runs, technicians mark reference panels by hand and match others through jigs. On larger runs, CNC routers handle both cutting and hole positions directly from digital files. Either way, we check test pieces against drawings so hook centers and wall-hanger locations line up before we touch full production lots.
Step 2: Cutting the Wood to Size
Once marking and measurement pass, we cut boards to length and width. Band saws and miter saws handle rectangular panels efficiently, while CNC routers cut house shapes, arrows, or custom silhouettes in one pass. Operators cut just outside target lines so the sanding step can refine edges without burning or tear-out.
For brands that need thousands of identical panels, we rely on CNC machines with tolerances near ±0.005 inch, a precision level supported by research on the impact of different interlocking joint shapes on the flexural strength of wooden assemblies. That level of precision keeps stacks uniform, which in turn keeps automated spray finishing and packaging lines smooth. It also means a key holder from one batch aligns well with a matching product from the next season.
Step 3: Initial Sanding
After cutting, every board goes through initial sanding so surfaces feel smooth in the customer’s hand. We start with 120-grit sanding using orbital sanders on the faces and edges, sometimes followed by quick hand passes on corners. The goal is a clean surface free of saw marks, chips, or sharp edges that could snag clothing.
During this step, workers slightly round the edges so the simple wooden key holder feels finished rather than like a raw plank. We check random pieces under strong light to find any cross-grain scratches. A quick test we use is to wipe a clean cotton cloth along the edge; if it snags, the board goes back for more sanding.
If we find rough areas, we correct them before stain enters the picture, because no finish hides poor sanding.
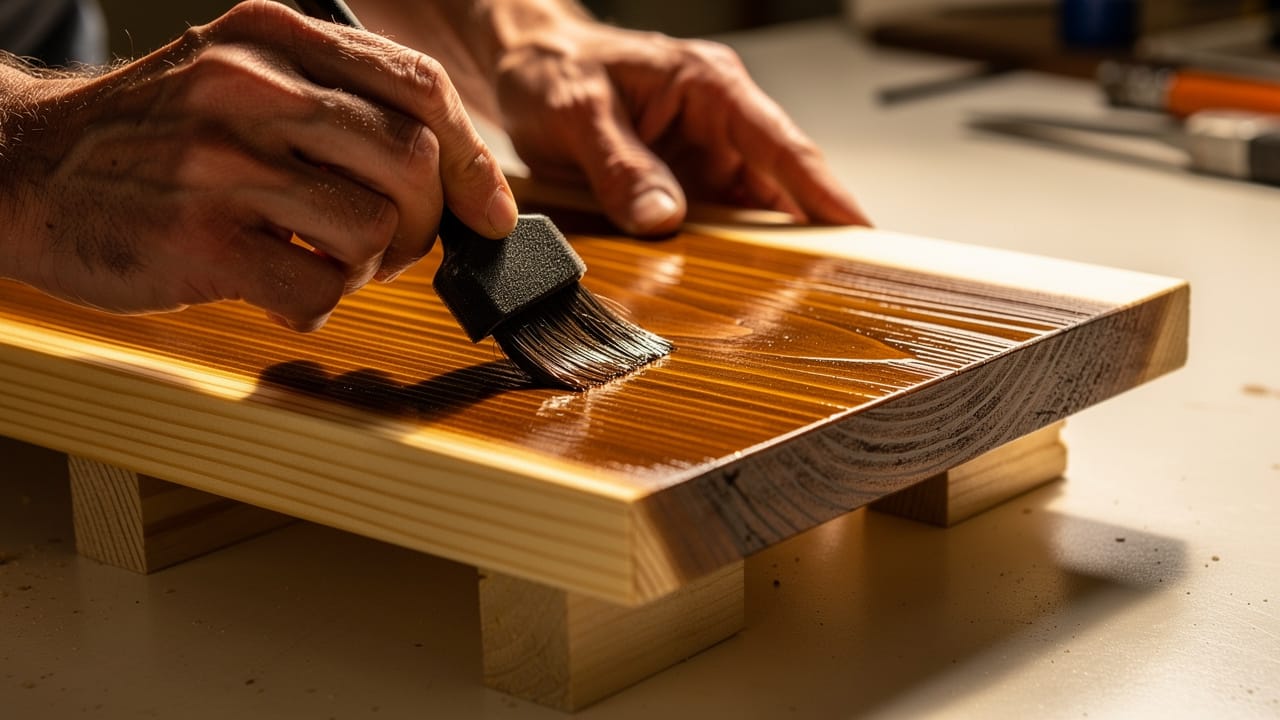
Step 4: Applying Wood Stain
Stain gives the wood its main color and highlights the grain pattern. We raise each board on small stands or suspended racks so we can reach all sides without sticking to the table. Technicians apply stain with foam brushes or automated spray guns, always moving along the grain to keep the color even.
After application, we wipe away any excess liquid to avoid sticky patches and blotches. Drying times depend on product, yet one hour between coats is a common benchmark. When a line needs deeper tones like espresso or ebony, we add a second coat. Stain ranges such as natural, walnut, and weathered gray become simple levers for new SKUs without tooling changes.
Step 5: Distressing for Rustic Aesthetics (Optional)
Some brands want a crisp, modern finish, and others request a more rustic, farmhouse look. For rustic lines, we add a light distressing step after the stain dries. Operators use medium-grit sandpaper on corners, edges, and raised grain to bring a bit of lighter wood back through the darker surface.
By adjusting pressure and coverage, we can match a soft-aged look or a strong vintage style. This approach lets one base design support multiple style directions with only a few extra minutes per unit.
Step 6: Applying a Protective Topcoat
A protective topcoat locks in the stain and guards against daily wear. We often use shellac, natural lacquer, water-based polyurethane, or wood-wax oil, depending on your market and environmental requirements. Our team applies a thin, even coat with foam brushes or automated spray, again following the grain for a clean appearance.
Coated boards rest in drying racks until the surface cures fully, which avoids fingerprints, smears, or marks in packaging. For premium SKUs, we may sand lightly with 220-grit between coats and apply a second layer for a smoother touch.
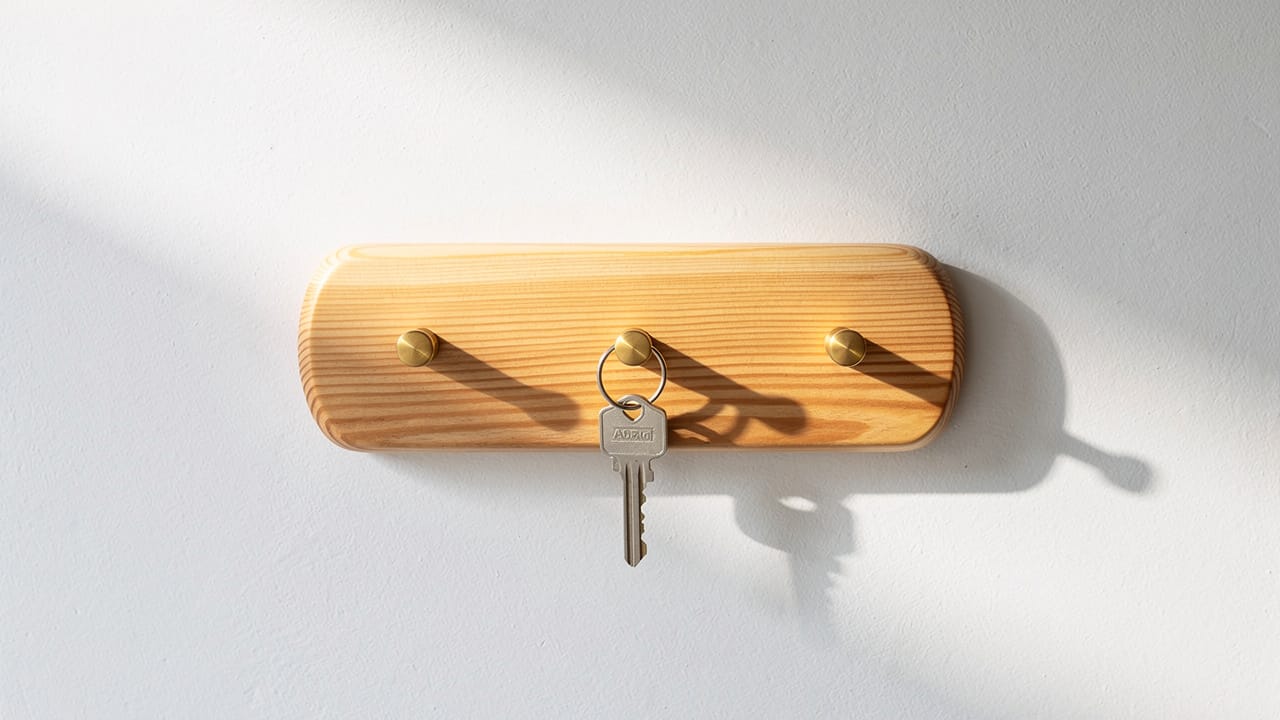
Step 7: Attaching Wall-Mounting Hardware
Once finishes cure, we install wall-mounting hardware on the back of each board. Sawtooth hangers work well for most key holders because they stay flat and catch wall screws easily. Workers position each hanger near the upper corners, about half an inch from each edge, and mark nail spots with fine tips.
We treat safety seriously here and use pliers to hold the small nails during hammering. That simple habit protects hands and also keeps nails straight. For heavier hardwood boards or long multi-hook panels, we can swap to keyhole brackets that lock onto wall screws and add extra security.
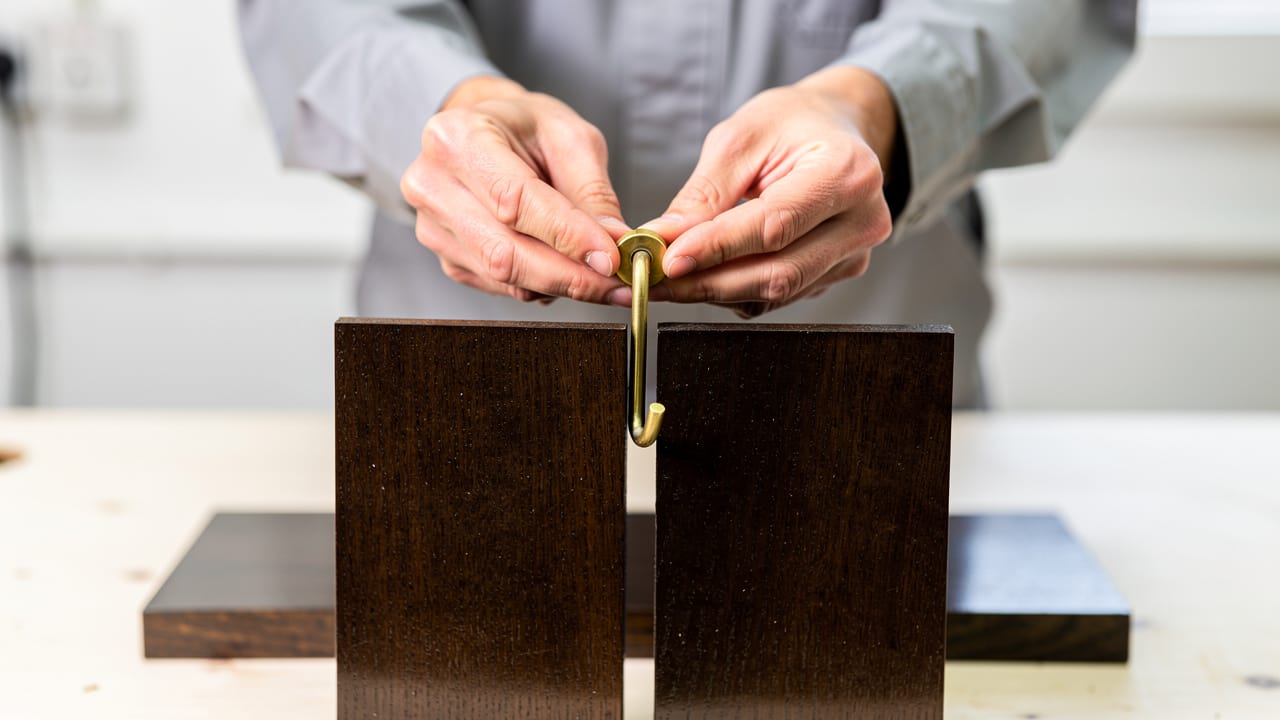
Step 8: Installing the Hooks
Hook installation forms the core function of the product. We rely on the layout defined earlier, often three to six hooks spaced evenly across the width. Workers place masking tape along the centerline of the front face, then mark hook centers on the tape for easy visibility without marking the finish.
Next, they drill shallow pilot holes that match the screw diameter but do not reach through the board. Hooks then thread into these holes by hand and tighten with a driver until snug. We check that every hook points outward and slightly upward so keys stay put during daily use. At this point, the key holders move to final inspection and packaging.
How to Plan Hook Layout, Spacing, and Design Variations
Hook layout, spacing, and overall design decide whether a wooden key holder feels tidy or awkward on the wall. Good layout respects real household needs while still looking balanced in product photos.
We start with board width and the target number of hooks. For a board around 8¾ inches wide with three hooks, we usually leave about one-inch margin on each side and space hooks roughly two to two-and-a-half inches apart. For wider boards, such as 12 to 16 inches with five to seven hooks, we repeat the same pattern: set side margins, then divide the remaining distance evenly by the number of gaps.
For quick planning, a few simple rules help:
- keep at least one inch of side margin
- aim for two to three inches between hooks on small boards
- on longer boards, adjust spacing slightly wider so full key sets do not collide
We also match hook type to use case:
- Simple cup hooks suit keys and small accessories.
- Larger coat-style hooks support bags, leashes, or light jackets along with keys.
- Decorative cast-iron or antique styles support farmhouse themes.
- Slim black hooks pair well with modern or industrial boards.
- For some corporate orders, we use magnetic strips or key-clip bars instead of classic hooks for a cleaner, office-ready look.
Shape and design variations keep the catalog lively without new tooling every season.
Quality Control Checkpoints That Protect Every Production Batch
Quality control checkpoints across the production line protect margins, reduce returns, and keep wholesale partners confident. Instead of one final check at the end, we spread smaller checks across each key step. That way, we catch problems while they still cost cents rather than entire batches.
We structure our inspection plan around six main checkpoints:
- After cutting: inspectors measure sample boards from the batch to confirm length, width, thickness, and squareness. Any drift triggers a reset of saw settings or CNC programs.
- After sanding: we run hands across boards and inspect under bright light to find rough spots, splinters, or inconsistent edge rounding. Rough pieces go back for another sanding pass.
- After stain: we check color tone and coverage by lining several boards from the same batch together and comparing their look. Dark patches, missed edges, or heavy wipe marks stand out quickly in this view.
- After topcoat: checks focus on cure level, gloss, and absence of drips or cloudiness. Boards that still feel soft or show marks stay in racks longer or receive light sanding and another coat.
- After hardware installation: inspectors test hook tightness with a gentle pull and confirm that all hooks sit on a consistent line. On the back, sawtooth hangers must sit flat and in symmetric positions, or the piece may hang crooked on the wall.
- Before packaging: we run a full visual check for dust, scratches, logo placement, and label accuracy.
Our goal at QlycheeCrafts is to hold visible defect rates under two percent per batch, which protects your reorder plans and keeps key holders reliable anchor items in your assortment.
The Smart Choice for Wooden Key Holder Production
Designing a key holder in wood at factory scale means linking material choices, dimensions, layout, finishing, and QA into one clear system. When every step, from moisture-controlled stock to final hook tightening, follows a stable routine, this simple SKU turns into a safe, repeatable part of your line. The eight-step process we use at QlycheeCrafts does that job for brands in many segments.
If you want wooden key holders that leave less to chance, our team supports free design input, low minimum orders, and fast sample cycles. You can reach us at sales@qlycheecrafts.com or through qlycheecrafts.com to review drawings, target price bands, and engraving options. From there, we can turn a tiny wall hanger into a reliable, well-behaved product line.
Frequently Asked Questions
What type of wood is best for a beginner key holder project?
Pine works well for a first key holder project and for many production runs. It stays affordable, machines easily, and takes stain well.
How thick should the wood be for a wall-mounted key holder?
A thickness near three-quarter inch usually gives the best balance. That size lets hook screws bite deeply without breaking through the back face.
What screws and hooks work best for a wooden key holder?
Standard brass or chrome-plated cup hooks with wood screws work very well for most key holders.
Can wooden key holders be customized with logos or names for wholesale orders?
Yes, wooden key holders handle logos, names, and artwork very well through laser engraving.