Let’s learn how to make a wooden flag by first selecting quality lumber and ripping it into uniform strips for the stripes. We’ll need to sand each piece thoroughly, arrange the boards according to flag dimensions, and secure them with wood glue and clamps.
After assembling the base, we’ll apply stains in chosen colors, carve or burn details, and finish with multiple protective clear coats. Following our thorough process guarantees a durable, customized piece of patriotic wall art.
Key Takeaways
- Cut the wooden boards into uniform strips, sand them thoroughly, and arrange them according to the flag dimensions before gluing and clamping them together.
- Install support braces on the back of the assembled boards for structural integrity and stability.
- Create the union design using stencils, then apply wood stains in the chosen colors for stripes (red stripes) and the background.
- For stars, secure the stencil with tape and carve using a Dremel tool or similar rotary device.
- Finish with multiple coats of satin clear coat, sanding between layers, and allow the coating to cure completely before handling.
Why Choose Wooden Flags?

We’ll examine why wooden flags stand out as superior display pieces, combining natural wood grain patterns and custom finishes to create unique, artisanal statements that mass-produced flags can’t match.
These durable creations withstand both indoor and outdoor conditions while offering versatile decorative options that complement any space, from rustic cabins to modern homes.
Our choice of wooden flags supports sustainable practices through the use of reclaimed materials. The crafting process allows for personal customization through specialized burning techniques, stain selections, and hand-carved details.
Unique Aesthetic Appeal
While traditional flags serve their patriotic purpose, wooden flags elevate the display of national pride through their distinctive aesthetic qualities.
We’ve found that each piece showcases unique grain patterns and natural textures, creating a rustic look that’s impossible to replicate with fabric. The eco-friendly approach of using natural materials resonates with today’s environmentally conscious decorators, while the varied wood types offer unlimited possibilities for customization.
When properly finished, these durable pieces maintain their charm in both indoor and outdoor settings. This makes them an investment that combines artistic expression with lasting functionality.
Durability and Longevity
Unlike traditional fabric flags that deteriorate over time and exposure, wooden flags remain enduring symbols of craftsmanship and patriotism.
When we properly treat these pieces with quality stains and sealants, they’ll maintain their structural integrity for decades.
The durability of wooden flags extends beyond their basic construction – carved details like stars prove more resilient than painted elements, ensuring longevity of design.
We’ve found that selecting premium woods such as cedar or oak greatly enhances the flag’s ability to withstand various weather conditions.
Each piece’s unique grain patterns contribute to both its strength and distinctive character, making it a lasting investment.
Versatility for Decor
A handcrafted wooden flag serves as a versatile decor element that transcends traditional design boundaries.
A rustic wooden American flag adapts seamlessly to various interior styles, from minimalist modern spaces to farmhouse-inspired rooms. The dimensional characteristics create striking visual depth that flat alternatives can’t match.
As a piece of patriotic decor, these flags offer exceptional customization options.
We can modify the burn intensity, stain colors, and finish types to complement existing design schemes.
Their three-dimensional construction adds architectural interest to walls while maintaining durability that surpasses fabric versions, making them practical for both indoor and outdoor displays.
Eco-Friendly Option
Choosing wooden flags represents a considerable step toward sustainable home decor, as these pieces embody environmental responsibility through their biodegradable nature and eco-conscious construction methods.
We’ve found that utilizing reclaimed wood notably reduces demands on new resources while preserving traditional craftsmanship.
When we apply eco-friendly finishes and water-based stains, we’re ensuring our flags remain safe for both indoor environments and eventual biodegradable disposal.
Opportunity for Customization
One significant advantage of wooden flags lies in their unparalleled customization potential.
We can adapt every aspect of the design, from dimensions to finish, ensuring your flag perfectly matches your vision. The natural wood grain provides a unique canvas, while hand-carved stars create a distinctive character that mass-produced flags can’t match.
Through careful selection of stains and finishes, we can achieve specific color palettes that complement your home’s interior design.
Whether you’re seeking a weathered rustic look or a polished modern aesthetic, wooden flag customization offers endless possibilities while maintaining the authentic craftsmanship that makes each piece special.
Materials Needed for Making a Wooden Flag

Let’s start by selecting our wood, where a 10-foot 1×10 board serves as the primary material. However, 1x4s through 1x10s will work equally well for constructing our wooden flag.
We’ll need essential tools, including a table saw or circular saw for precise cuts, a propane torch for wood burning effects, and a Dremel tool for intricate detail work.
Our finishing supplies must include Minwax water-based stains in navy blue, crimson, and true black, wood glue, brad nails, and satin clear coat for protection.
Types of Wood Suitable for Flag Making
When planning your wooden flag project, pine stands out as the primary choice due to its widespread availability and budget-friendly nature. For a DIY wooden American flag with enhanced durability, consider oak or poplar. We’ve found that combining different types of wood creates compelling visual effects: maple adds strength while cedar offers lightweight carving potential.
| Wood Type | Characteristics | Best Use |
|---|---|---|
| Pine | Affordable | Base |
| Oak | Durable | Stripes |
| Poplar | Workable | Details |
| Maple | Strong | Support |
| Cedar | Lightweight | Stars |
Reclaimed wood offers a unique character and environmental benefits, while 1×2 boards excel in intricate details for your flag design.
Additional Supplies: Paint, Glue, and Tools
Creating a quality wooden flag requires a broader set of supplies than just lumber. Below is a brand-neutral, general list of materials and tools needed to achieve solid construction and a professional finish:
For coloring:
- Water-based or oil-based stains/paints in the desired colors (e.g., navy blue, crimson, black)
- Brushes of various sizes and types (flat, round, synthetic bristles)
- Satin clear coat or protective varnish
For assembly:
- Good-quality wood glue
- Small finishing nails, brad nails, or thin wood screws
- Back braces or corner brackets to reinforce the structure
For cutting and shaping:
- Table saw or circular saw set to the desired thickness
- Rotary tool (multi-tool) with sanding and carving bits
- Files, rasp, sander, and sandpaper in assorted grits and sanding blocks
For finishing touches:
- Small torch or heat tool for controlled burn effects (use with caution)
- Drill for mounting hardware and pilot holes
- Hanging system (hooks, cables, or mounting frame) appropriate to the flag’s weight and size
Safety equipment:
- Dust mask or respirator, safety goggles, and work gloves
- Fire extinguisher or fire blanket within reach if using a torch
Miscellaneous supplies:
- Drop cloths or protective paper for the workspace
- Masking tape, clamps, and contact adhesive if needed
- Tape measure, straightedge, and pencils for marking and layout
How to Make a Wooden American Flag: Step-by-Step Process

Let’s begin our American wood flag project by measuring and cutting our 10 ft 1×10 board into 37-inch pieces, ensuring precise cuts and smooth edges through careful sanding.
We’ll continue by ripping the pieces to 1.5-inch widths on a table saw and assembling them with glue and back braces to create the base structure of our flag.
After carving our stars with a Dremel 4000 and applying the desired torch-burn finish, we’ll seal our creation with a satin clear coat for lasting durability.
Step 1: Measuring and Cutting the Wood
Before diving into construction, proper measurement and cutting of your wooden pieces will establish the foundation for a professional-looking flag.
Let’s begin with a 10-foot 1×10 board as our base material. We’ll measure and mark precise 37-inch segments along the board’s length, ensuring clean, square cuts at each mark.
Next, we’ll set our table saw blade height to 1.5 inches to rip the sections into uniform strips. Before assembly, we’ll sand all edges thoroughly for a smooth finish.
Finally, we’ll lay out our strips, experimenting with grain patterns to create visual interest in the final piece.
Step 2: Sawing and Sanding for Smooth Edges
Proper sawing and sanding techniques form the critical foundation of your wooden flag project.
We’ll start by cleaning the board ends to eliminate splinters that could compromise our measurements. Using a straight edge, we’ll mark precise 37-inch lengths before proceeding to the table saw.
Set the table saw to 1.5 inches and carefully rip the board into uniform strips.
As we progress, we’ll thoroughly sand each piece, paying special attention to the edges. This process not only smooths the wood’s surface but also prepares it for even wood color absorption later.
Remember to maintain clean equipment throughout for ideal results.
Step 3: Assembling the Flag Base
With our sanded pieces ready, assembling the flag base requires methodical organization and precise alignment.
We’ll first lay out the 37-inch boards according to our wooden American flag dimensions, ensuring each stripe sits perfectly flush with its neighbors.
Let’s apply wood glue along the edges, then use clamps to secure the pieces, placing scrap wood at the contact points to prevent damage.
Once we’ve confirmed proper alignment, we’ll attach two back braces perpendicular to the stripes using glue and brad nails for structural integrity.
This creates a solid foundation for our subsequent detailing work.
Step 4: Designing and Painting the Flag
The artistic phase of flag creation demands precise execution and attention to detail.
We’ll begin designing by positioning the union stencil and cutting the top grain with razor blades to establish clean borders. For painting, we’ll apply water-based stain in navy blue and crimson, or true black for a classic look.
After securing the star stencil with tape, we’ll use a Dremel 4000 at varying speeds to carve precise stars into the wood.
Finally, we’ll enhance the natural grain with a medium propane torch burn before applying a protective satin clear coat, sanding lightly between coats.
Step 5: Sealing the Wood for Durability
Sealing a wooden flag requires meticulous preparation to confirm long-lasting durability. Before applying the sealant, we’ll need to sand all surfaces to create ideal adhesion lightly.
Let’s use a high-quality satin clear coat, applying it with a sprayer for even coverage on larger flags.
We’ll sand between each coat to guarantee proper bonding and a refined finish. Follow the manufacturer’s guidelines carefully during application.
Remember to let the final clear coat cure completely before handling or mounting the flag. This careful attention to the sealing process will protect your wooden flag for years to come.
Step 6: Attaching Mounting Hardware
Now that your flag’s finish has fully cured, mounting hardware installation begins our final phase.
We’ll start by pre-drilling holes in the back of your flag, spacing them evenly to guarantee balanced support.
Cut your mounting cable to size, then secure it using designated screws and washers at each attachment point.
For added stability, we’ll install a mounting bracket that can adequately support the flag’s weight.
After attaching the mounting hardware, we’ll use a level to verify straight alignment and make any necessary adjustments before final tightening.
Creative Customization Ideas for Wooden Flags

Let’s explore how to transform a basic wooden flag into a personalized masterpiece by carving names, dates, and meaningful messages directly into the wood’s surface.
Personalized Names or Messages
When creating a personalized wooden flag, there are several effective techniques to incorporate custom names or messages that enhance its sentimental value.
Using a Dremel tool, we can carve personalized names directly into the wood, creating depth and permanence. For a more controlled approach, we’ll apply stencils to paint or stain messages in contrasting colors.
Consider placing customizations on the bottom stripe or beneath the star field to maintain the flag’s traditional design.
We can also use a scorch marker to create rustic text effects or add decorative wooden elements, such as stars or anchors, to complement the personalized message.
Company Logo or Brand Elements
Artisans seeking to incorporate corporate identity into wooden flags have several professional options for brand integration.
We recommend using precision stenciling or engraving techniques to position your company logo as the focal point. Custom designs can be carved using a Dremel tool, ensuring clean lines and professional results.
For lasting impact, we suggest applying stains that match your brand’s color palette.
Consider adding your mission statement along the border through detailed engraving. After completing all brand elements, protect your work with a satin clear coat to preserve the design integrity and enhance its longevity outdoors.
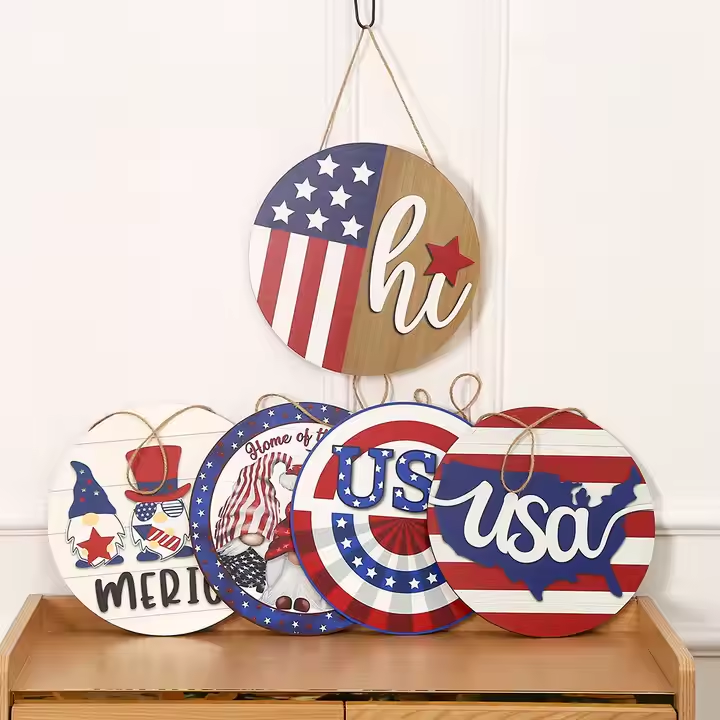
Unique Shapes and Sizes
Breaking free from traditional rectangular designs, wooden flags can be transformed into striking custom shapes that reflect personal meaning or regional pride.
We’ve found that state outlines, symbols, and three-dimensional configurations offer compelling alternatives to standard formats.
To customize dimensions, we recommend using plywood of varying sizes, such as 1×4, 1×6, and 1×10, to create depth through layered construction.
For enhanced visual interest, incorporate jutting sections and irregular edges.
Consider implementing themed colors and graphics that tell your unique story, while maintaining structural integrity through proper bracing and secure assembly techniques.
Mixed Media Integration
Through innovative mixed media integration, wooden flags transform from traditional pieces into dynamic works of art that engage multiple senses and textures.
We’ll show you how to incorporate fabric inlays between wood segments for textural contrast, or add metallic elements like soldered stars and decorative nails for dimensional depth.
Let’s explore embellishments, such as LED backlighting, that create dramatic shadows through carved elements.
We can layer different materials strategically, combining smooth wood with rough metal or integrating fabric strips with stained panels, to achieve a contemporary interpretation that honors traditional flag designs while pushing creative boundaries.
Conclusion: How to Make a Wooden Flag
We’ve covered every essential step to craft a professional-grade wooden flag, from selecting precise lumber to applying the final protective coating. By following our technical specifications for measurements, joint construction, and finishing techniques, you’ll achieve museum-quality results.
Remember to maintain consistent spacing between stripes and verify symmetrical star placement for peak visual impact. Let’s celebrate your craftsmanship and patriotism through this meticulously executed woodworking project.
FAQs
What Are the Dimensions for Making a Wooden Flag?
We’ll need a 10-foot 1×10 board, cutting it into 37-inch stripes. The final dimensions are 3×5 feet, with the canton measuring 2.5×1.25 feet and stars at 1.5 inches each.
How to Create a Simple Flag?
Let’s cut our 10-foot board into 37-inch pieces, sand the edges, torch for a medium burn, glue the stripes together with back braces, carve stars using a Dremel, and finish with a satin clear coat.
Is It Illegal to Fly a Flag at Night Without a Light?
While it’s not illegal to fly a flag without lighting at night, we should follow the U.S. Flag Code’s guidance, which recommends proper illumination as a sign of respect.
How Do I Create My Own Flag?
Let’s cut our 10-foot board into 37-inch stripes, sand thoroughly, and torch for texture. We’ll assemble with glue, add carved stars using a Dremel, then finish with stain and satin coating.