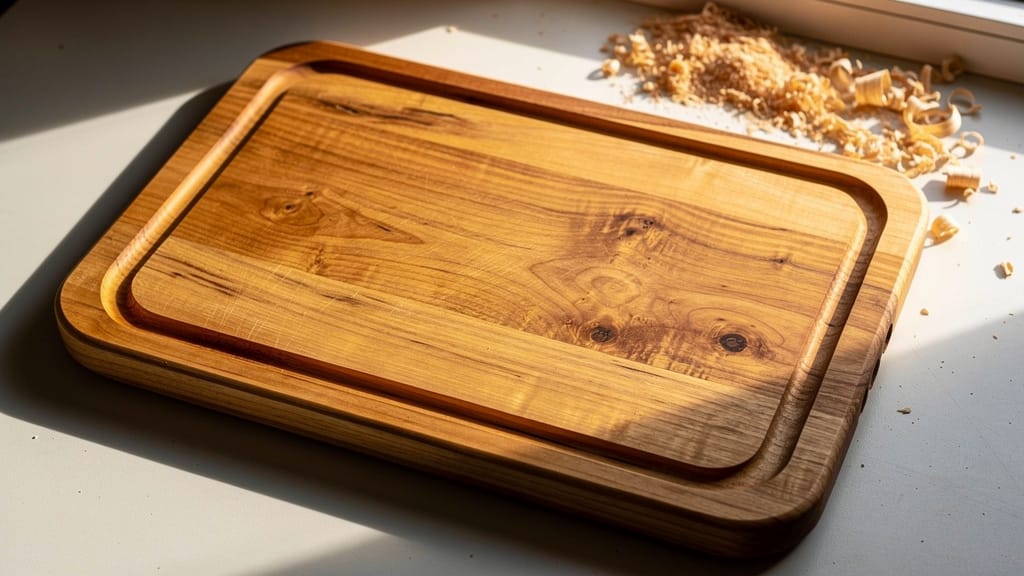
Picture a chef carving a roast on a solid wooden board. The knife moves fast, the meat is dripping, yet the counter stays clean because a rounded channel catches every drop. That quiet feature is what turns plain lumber into a premium cutting board with a juice groove.
For a retail brand, restaurant group, or e‑commerce store, that little groove:
- Adds a clear, visible function
- Keeps prep cleaner
- Justifies higher pricing
Once you understand how to cut a juice groove in a cutting board, you can talk clearly with suppliers, review samples with confidence, or train your own shop staff.
“Measure twice, cut once” is the line every good shop lives by — and it applies to juice grooves more than almost any other detail.
This guide distills the process used by professional shops and manufacturers such as Qlychee Crafts: tools, setup, routing technique, finishing, and quality checks. By the end, you will know how a proper groove should look, feel, and function.
Key Takeaways
- Use a plunge router, the right bit, and a jig or template to keep cuts straight and repeatable.
- Make several shallow passes instead of one deep cut to protect the bit and the board.
- Vacuum chips and dust after each pass so the router tracks cleanly.
- Prevent burn marks with sharp bits and a steady feed rate.
- Sand and oil the groove to create a smooth, food‑safe detail ready for the kitchen or retail shelf.
What Is a Juice Groove and Why Does It Matter?

A juice groove is a shallow channel routed near the edge of a cutting board. It usually follows the board’s outline with rounded corners and a smooth, curved bottom made with a round‑nose or juice groove router bit.
Its job is simple: keep liquid where it belongs.
- Function: Juices from meat, tomatoes, citrus, and melons collect in the groove instead of spilling onto the counter.
- Hygiene: Containing liquid on the board helps reduce cross‑contamination and makes cleaning with hot water and soap more effective.
- Style: A neat, even groove frames the wood grain and signals a higher‑grade product that chefs and shoppers spot instantly, reflecting the kind of traditional lime craftsmanship in woodworking that emphasizes precision and heritage techniques.
For brands and buyers, that visible detail is a fast way to separate premium cutting boards from basic flat ones.
Essential Tools and Materials You Will Need
A clean, consistent cutting board juice groove needs more than “any router.” The right setup makes the work safer, faster, and far more repeatable.
| Tool Group | Examples |
|---|---|
| Core Tools | Plunge router, juice groove/core box bit, jig |
| Measuring/Layout | Ruler, square, pencil, marking gauge/spacer block |
| Safety & Hold‑Down | Clamps, dust collection, eye/ear/dust protection |
| Finishing Extras | Bit spray, paste wax, 220‑grit sandpaper, oil |
Key points:
- Plunge router: Ideal for this job because you can set exact depths and lower the bit straight down. A compact palm router often feels more stable on cutting boards.
- Router bits: Use a juice groove bit or a core box (round‑nose) bit in the 1/2″–3/4″ range. Keep it sharp and clean to avoid tear‑out and burn marks.
- Guides: A commercial juice groove jig or a simple DIY template (rails around the board) keeps the router in the right place on every pass.
- Safety: Firm clamping, dust extraction, and proper protection are non‑negotiable any time a router is running.
Preparing Your Cutting Board for Routing

Good routing starts with good prep. A few minutes here saves boards later.
1. Choose the board:
- Prefer hardwoods like maple, cherry, walnut, or teak.
- Avoid warped, cracked, or very soft wood.
2. Decide groove offset and depth:
- Offset from edge: usually 1/2″ to 1″ depending on board size.
- Depth: 1/8″ to 1/4″ — deep enough to hold liquid without weakening the board.
3. Mark the layout:
- Use a ruler and square to mark a light pencil border where the inside edge of the groove will land.
- Check that lines are parallel and corners are square.
4. Secure the board:
- Place it on a flat bench or sacrificial sheet.
- Clamp at least two corners (four on larger boards) so nothing can shift.
5. Pre‑routing checklist:
- Surface flat and smooth
- Layout looks even all around
- Router bit tight, base clean, hose and cord clear of the path
Setting Up Your Router and Jig System

With the board marked and clamped, it is time to set up the router and the guide that will control the cut.
Installing the Router Bit and Guide Components
- Unplug the router.
- Insert the juice groove or core box bit into the collet, leaving a little shank showing above the collet so it seats well. Tighten firmly with both wrenches.
- If using a guide bushing, mount it in the base so it rides the jig frame. Spin the shaft by hand to check for smooth, wobble‑free movement before plugging in.
Configuring a Commercial Jig
A commercial juice groove jig speeds up repeat work:
- Loosen the corner guides and adjust the frame so its inner edge matches your layout lines.
- Clamp or lock the jig to the board so that nothing can move under router pressure.
- Measure diagonals or use a square at the corners to confirm alignment.
Attach a fence or guide rail to the jig frame to ensure the router maintains a consistent path along the groove.
Building and Positioning a DIY Template
For a homemade template:
- Measure the distance from the router bit to the outside of the base (the offset).
- Add that offset to the desired groove distance from the board edge to find where your rails should sit.
- Cut straight strips of MDF or plywood and fasten them around the board with strong tape or small brads.
- Check the opposite rails for parallel and the corners for square; this frame defines the groove path.
Routing the Juice Groove: Step-by-Step Process

Routing a juice groove in a cutting board is all about shallow, repeatable passes.
1. Set the starting depth:
- With the router on the board and against the guide, lower the bit until it just touches the wood and set this as zero.
- Adjust the depth stop for a first cut of about 1/16″–1/8″.
2. Make the first pass:
- Start at a corner with the router base flat.
- Turn it on, let it reach full speed, then plunge to the preset depth.
- Move steadily, keeping firm pressure toward the jig or rails. Many woodworkers move clockwise around the board.
3. Clean the groove:
- Raise the bit while it is still spinning, let it clear the cut, then switch off.
- Vacuum chips from the groove and along the guide before the next pass.
4. Repeat in shallow steps:
- Lower the bit another 1/16″–1/8″ and rout again.
- Most boards reach full depth in 3–4 passes; very hard or end‑grain boards may need one extra light pass.
5. Check depth and shape:
- Use a small ruler or depth gauge to confirm you hit your target depth.
- Rounded corners inside the groove are standard and easy to clean.
Professional Techniques for Flawless Results
The basics are simple; the “factory look” comes from small habits.
- Avoid burn marks: Keep the router moving at a steady, moderate pace. If you see smoke or dark streaks, your pass is too deep or the bit is dull.
- Keep bits sharp and clean: Resin on cutting edges makes bits rub instead of cut. Clean and sharpen or replace when routing starts to feel labored.
- Use a stable stance and grip: Stand close to the bench with feet apart, both hands on the router — one guiding, one pressing against the guide. Avoid rocking the router.
- Adjust for wood species: Dense maple or teak prefer lighter cuts; softer woods can crush at the edge if you push too hard or move too fast.
- Inspect as you go: Look along the groove with strong light; it should appear even in width and parallel with the board edge.
A common shop rule says, “If it looks wrong now, it will look worse on the sales floor.” Stop and fix small issues while you are still in the jig.
Finishing and Refining Your Juice Groove

Routing gives you the shape; finishing makes it ready for the kitchen.
1. Inspect:
- Run your fingers around the groove to find rough spots, steps between passes, or chips at the edges.
2. Sand:
- Wrap 220‑grit sandpaper around a dowel or small block and sand along the groove.
- For stubborn rough areas, start with 150‑grit, then switch back to 220.
3. Clean:
- Vacuum dust from the groove and wipe the board with a slightly damp cloth or tack cloth.
- Any dust left behind can mix with oil and dull the look.
4. Oil and finish:
- Apply a food‑safe finish such as mineral oil, beeswax blends, or plant‑based oils like the German vegetable oil.
- Let it soak in, then wipe away the excess. The groove should feel smooth and look rich, not muddy.
Common Mistakes and How to Avoid Them
Even experienced woodworkers slip up on the small things. Watch for these:
- Cutting too deep on the first pass: Leads to grabbing, chatter, or stalling. Stick to shallow cuts.
- Routing with a dull bit: Causes heat, rough fibers, and burn marks. Clean and sharpen or replace bits regularly.
- Skipping cleanup between passes: Packed chips under the base or bushing push the bit off track and create wavy grooves.
- Misaligned jigs or templates result in grooves too close to the edge or obviously skewed. Double‑check layout and test‑run the router with the motor off.
- Uneven feed rate: Moving too slowly burns wood; moving too fast tears grain. Aim for a steady sound from the router.
- Poor clamping: A moving board can ruin the groove and damage the bit. Clamp firmly and test by pushing on the corners.
- Ignoring safety gear, routers throw chips fast and are loud. Use eye protection, hearing protection, and a dust mask every time.
Qlychee Crafts: Your Partner for Premium Cutting Boards
Reading about how to put a juice groove in a cutting board shows that the process is very doable, but high‑volume, consistent work is another story. Making one board with a simple jig is one thing; delivering hundreds or thousands with the same depth, width, and offset is production work — and that is where Qlychee Crafts focuses.
Qlychee Crafts produces cutting boards with juice grooves using:
- Industrial CNC routers and precision jigs for repeatable cuts
- A structured multistep manufacturing flow from rough milling to final sanding
- Kiln‑dried hardwoods (maple, cherry, walnut, teak) in both edge‑grain and end‑grain formats
Groove dimensions are programmed and checked so that every board in a lot matches your product spec. Boards are finished with food‑safe oils and waxes, including mineral oil, beeswax blends, and German vegetable oils that work well for health‑conscious buyers and professional kitchens.
As one production manager likes to say, “Consistency is a feature — your customer feels it every time they pick up the board.”
For OEM and private‑label work, Qlychee Crafts offers:
- Custom sizes, wood species, and groove placement
- Optional laser‑engraved logos or CNC‑cut shapes
- Support from in‑house designers and engineers on layout, branding, and packaging
- Inspection reports and third‑party tests when documentation for food‑contact products is needed
If you prefer factory‑made boards with professional juice grooves instead of routing them in‑house, Qlychee Crafts can handle samples, custom specs, and wholesale terms for your brand.
Conclusion: How to Cut a Juice Groove in a Cutting Board
A well‑made juice groove turns a plain slab into a board that handles carving, juicy fruit, and busy service without soaking the countertop. Liquid stays in a neat channel that you can pour off and wipe clean, while the groove itself frames the wood and signals quality.
Success in how to make a juice groove in cutting board stock comes from:
- Shallow, repeatable passes
- Sharp, clean bits
- Solid jig or template setup
- Careful sanding and finishing
From a business angle, knowing this process helps whether you rout boards yourself or source from a factory. You can write clearer specs, ask sharper questions, and judge samples with a more trained eye.
Your next move is simple: practice on scrap until your groove looks ready for retail, or talk with Qlychee Crafts about ready‑made cutting boards with professional juice grooves and custom branding. Either way, that narrow channel says a lot about how seriously your brand treats quality in the kitchen.
FAQs
What Type of Router Is Best for Cutting a Juice Groove in a Cutting Board?
A plunge router is best because it lets you set accurate depths and lower the bit straight into the board. A compact trim or palm router is easier to control on small and medium boards. Fixed‑base routers can work, but starting and stopping cuts cleanly takes more practice.
How Deep Should a Juice Groove Be?
Most juice grooves are 1/8″–1/4″ (3–6 mm) deep. That is enough to hold juices from meat and fruit without making the board feel thin or weak. On very thick carving boards you can go a little deeper; on thin boards, stay closer to 1/8″ for strength.
Can I Cut a Juice Groove Without a Router?
Yes, but it is slow. You can use chisels and carving gouges to cut a groove by hand, yet keeping width and depth consistent on many boards is difficult. The surface also ends up rougher and harder to clean. For any serious production, a router plus jig or template is the practical choice.
How Far From the Edge Should a Juice Groove Be Positioned?
Most makers place the groove 1/2″ to 1″ from the outer edge of the cutting board. That leaves enough solid wood at the edge for strength and a balanced look. Larger carving boards often look better with a wider border; smaller boards usually benefit from a slightly tighter frame.
Why Does My Router Bit Burn the Wood, and How Can I Prevent It?
Burn marks appear when the bit stays in one spot too long, is dull, or is cutting too deeply. To avoid this, keep the router moving at a steady pace, take shallow passes, and use sharp, clean bits. A quick touch‑up with 220‑grit sandpaper usually removes light burns.
What Size Router Bit Should I Use for a Juice Groove?
For most boards, a 1/2″ or 3/4″ round‑nose or juice groove bit works well. Wider bits suit large carving boards; narrower bits look better on compact prep boards. A dedicated juice groove bit with rounded shoulders leaves a channel that is easy to wipe and pleasant to the touch.